
Art theft statistics state that around 50,000 pieces of artwork are stolen yearly. People prefer to get their hands on artistic masterpieces and manipulate them to present as their own. Therefore, it is essential to use digital watermarks to show the art owner and save them from unauthorized access.
A digital watermark is usually typed and printed in the corner of the project. One can market the work through a watermark and gives a professional vibe to your designs. The article under review presents the pros of using watermarks in detail while offering two workable and easy methods to add watermark in Photoshop.
In this article
Part 1 Digital Watermarking- Looking into the Advantages in Detail
We are living in a digital world where electronic processes surround us inevitably. A digital watermark is an identification of the author of the design, which is posted online. It can be a logo, a name, or a brand identification that tells the masses about the owner of the masterpiece. Add logo to photo in Photoshop to perform the process effortlessly.
Before practicing the usage of watermarks in your design, it is vital to study its pros. Let us have a look below.
Theft Protection
The use of a watermark plays a pivotal role in the theft protection of original masterpieces. If the user makes their living from selling art, it is crucial to protect it at all costs. People tend to scrap one's hard work for profits and affect the designer terribly.
Brand Advertising and Advocacy
Another advantage of having a digital watermark revolves around brand advertising and acts as a good marketing strategy. Create watermark in Photoshop as it results in people knowing the author and owner of the design. A good deal of brand advocacy also occurs through a digital watermark.
Design Credibility
A digital watermark offers a certain level of professionalism and credibility to the design. Make a watermark in Photoshop as it puts artwork at an equal level to large photo agencies. These agencies use a watermark to secure their income streams. If you do so, you are automatically giving competition to some professional and high-level image producers.
Be Known of Its Location
Putting up a digital watermark within the copies of your image will allow you to know where the copies have been taken to. Such images include a tracking component which makes it special and lets you know where the copy of the image is precisely situated. This would let you know your product's reach and set up your portfolio.
Part 2 Workable Methods to Make a Watermark in Photoshop
A watermark can be designed through Photoshop effortlessly. However, the user must have a little know-how to operate Photoshop. Add watermark on Photoshop by using two methods. Both of them are explained extensively below so that the process is effective and viable.
2.1. Make a Watermark in Photoshop Manually
If the user is willing to create a watermark using Photoshop, follow the steps below to get desirable results.
Step 1: Launch the Logo
Open the logo that the user wants as a watermark and make sure that it is high-resolution imagery. The usage of a black and grey color scheme happens to be the best choice in this situation.

Step 2: Renaming Brush Preset
After that, the user needs to go to "Edit" and hit on "Define Brush Preset." The renaming section appears. Type "Watermark Temp" there. Launch the picture that you work with every time.

Step 3: Testing the Brush
Now develop a "New Layer" and test the brush. It is because it helps you choose the size and color of the watermark based on the imagery.

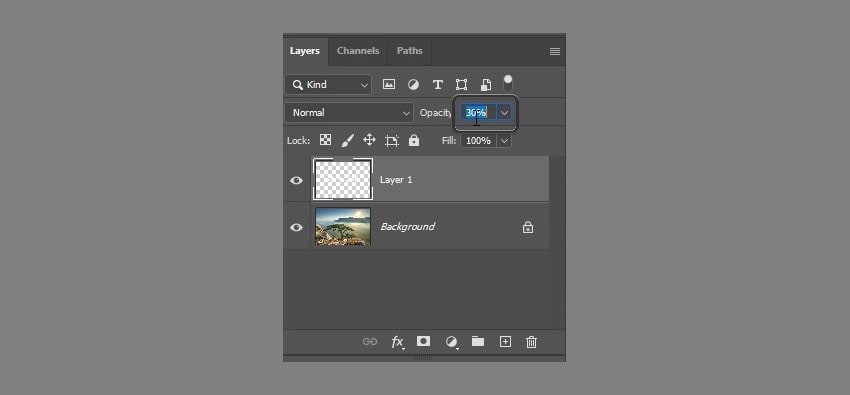
Step 4: Choosing the Brush Opacity
To make the watermark semi-transparent, the user is directed to use the "Move" tool and press the numbers on the keyboard randomly. It will help in experimenting with the required opacity of the layer. After the perfect opacity is found, copy the value. Use the "Brush" tool and paste it in the upper bar.
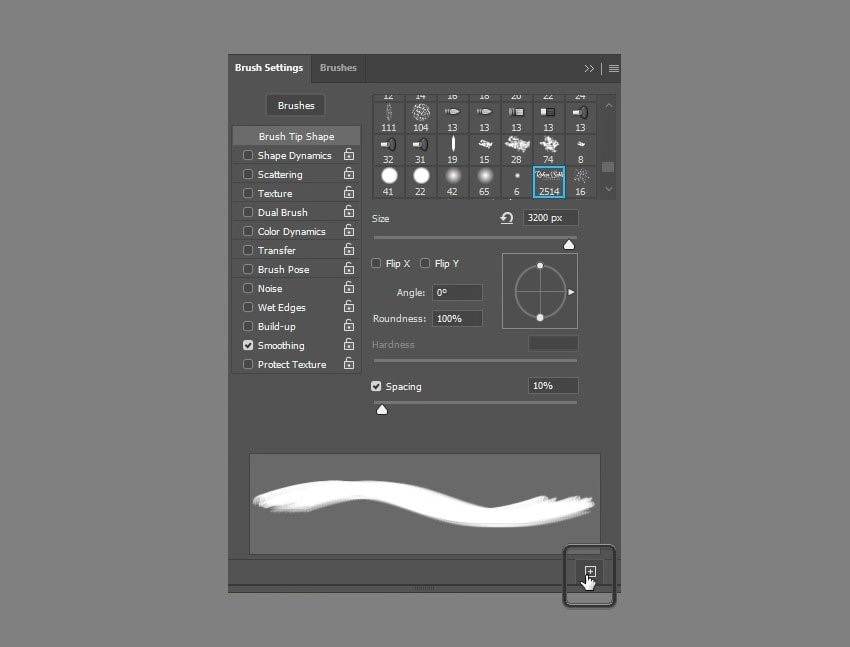
Step 5: Confirming the Settings
After that, navigate to the "Brush Settings" and click on "Create New Brush." Now, choose all the options to confirm the settings. After that, name the file "Watermark."
Step 6: Saving the Settings
Now, remove the watermark "Temp Brush." The user is free to use the main watermark brush now. The settings are saved, and the user doesn't have to change them every time a watermark has to be added.

2.2. Batch Watermark Photos in Photoshop
Following is a step-by-step procedure to create watermark in Photoshop using the Batch edit function.
Step 1: Preliminary Process
For starters, navigate to "File" and click on "Automate." Hit "Batch" afterward. The user is suggested to make sure that the Watermark option is in the "Play" section.

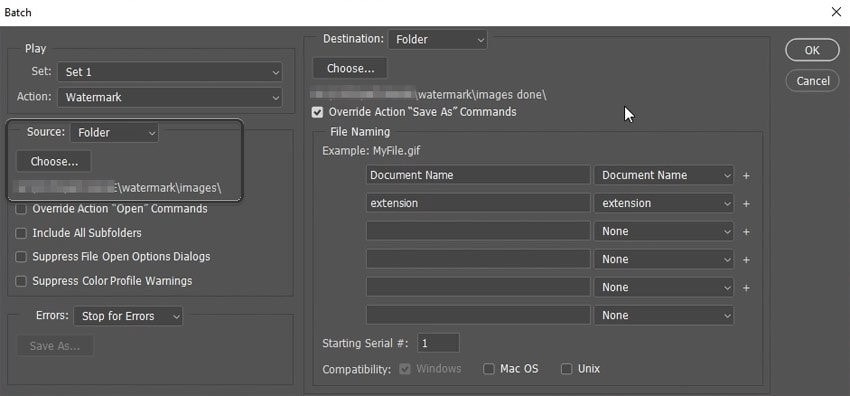
Step 2: Choosing Source and Destination
Tap on "Source" to provide the software with the targeted pictures. From the "Destination" panel, pick out the folder to keep the edited images.
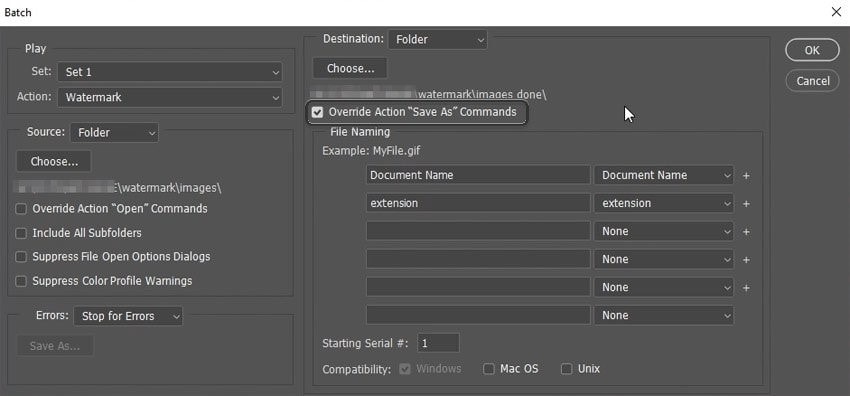
Step 3: Confirming the Settings
Now, the user is instructed to check "Override Action "Save As" Commands." Keep the rest of the settings as they are. Tap "Ok."
Step 4: Process Initiation
Photoshop will run its course. It may take some time, but the user can minimize the process and perform other tasks meanwhile.

Final Thoughts:
All creative professionals are possessive about their artworks. They are willing to go extra bounds to protect their ownership and save them from art thefts. For the same reason, the article discussed ways to add watermark in Photoshop. One can update the "Settings" according to the imagery and insert a watermark in bulk.
However, there are specific benefits related to adding digital watermarks to one's design and photos. The users are suggested to make the right decision based on their brand requirements and present trends.