With the rise of digital photography, JPG or JPEG images are the common terms we usually hear. Basically, there is no evident difference between jpg or jpeg images because they both are image formats used for saving compressed image files. As JPEG stands for "Joint Photographic Experts Group," it is commonly used to save image data in smaller file sizes with high-quality resolution.
Do you know that why the JPEG image format is most commonly used? The reason lies in its convenience of transferring image data with a high-quality color spectrum. It is almost compatible with every software and hardware running on your computer. JPG/JPEG images can also be easily uploaded on webpages with fast speed and can be printed with good quality. This article will give simple guidelines on how to add and remove watermark from JPG/JPEG image files conveniently.
In this article
Part 1: What is Watermark and Why People Use Watermark on JPG/JPEG Files?
Copyright violation is a serious threat to digital marketing, online content, piece of art, and many more. To protect and secure your content from theft, a watermark is being widely used in photography as a stamp or logo on any sort of content. People use watermark when they put their content online so that it won’t get copied without your permission. We can define a watermark as a text or pattern overlapped on images to give due credits to the creator.
Watermarking is not only used for copyright issues as people also use it to promote their brand’s name or to preserve the originality of their content. As JPG/JPEG is the most common image format, people use a watermark on them for various reasons such as:
- Security: Security of your digital content, such as photography, is essential to prevent online theft. Without a watermark placed on your photos, anyone can easily extract that image and use it without mentioning your credits for their own benefit.
- Brand Development: Everyone wants their content to be recognized and get its due appreciation. With the use of a watermark, you can effortlessly do your brand’s promotion and can get acknowledgment of your work.
- Preservation of Originality: With easy access to the internet, anyone can copy your content and can make multiple duplicates. To preserve the original content, one must use a watermark so that no one can extract your original idea.
- Prevention of Illegal Use: Unauthorized distribution is very common in digital marketing. One can spread misinformation using your content which could harm the reputation of your brand. So to avoid illegal use of the content, watermarks are essential.
Part 2: How to Watermark JPG/JPEG Files Using Web-Based Tool?
Watermarking your content brings numerous benefits with it, as mentioned earlier. Are you eager to know that how to add watermark to JPG/JPEG files without installing any software? Then Watermark Website is the best web-based tool to solve all your concerns. Watermark Website is an excellent tool to add watermarks on photos, videos, or any kind of JPG/JPEG file. They don’t demand to download anything as you can do editing comfortably with internet usage.
You can create customized watermarks with various options of fonts, colors, and templates. You can also extract ideas from their samples and pre-designed templates. Their game-changing editing tools can enhance your images with few clicks. The procedure to how to add watermark in JPEG image is simple and trouble-free such as:
Step 1: Go to Watermark Website
To start up the process, go to the Watermark website and select “Enter” by clicking on it.

Step 2: Upload your JPG/JPEG File
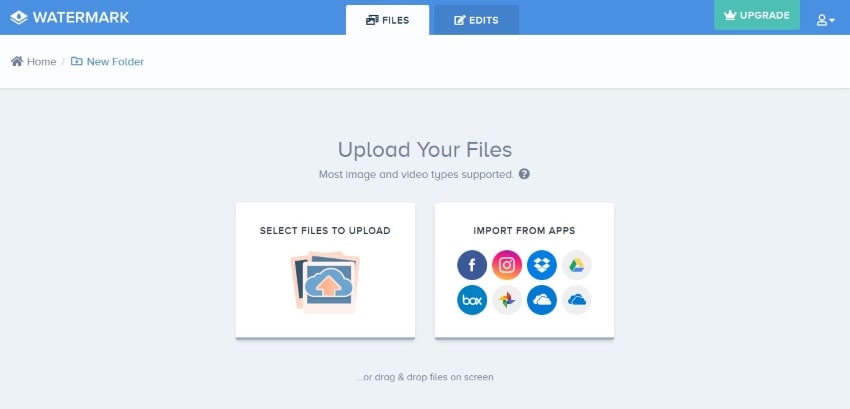
There will be many options displayed on your screen. You can either upload files from your computer or can import files from any other app. Select the option and upload the file you want to edit.
Step 3: Start to Edit
After uploading a file, select the photo and tap on "Edit." Afterward, their editor page will display many toolbars. Click on "Watermark," and there will be three options for watermarking. You can apply text, logo, or signature as a watermark according to your will. Check out all the options such as font size, positioning, crop, and background. Click on "Apply" to carry on the process.

Step 4: Finish and Download File
After editing, click on "Finish" at the right bottom. Afterward, to download the file, select "Download," and your edited file will be saved on your computer.

Part 3: Way of Adding Watermark on JPG/JPEG Files Without Internet?
Many times we are restricted because of internet connection. So in order to solve your problem, we will unveil an efficient tool through which you can comfortably add watermarks on JPG/JPEG files without the internet.
WaterMark is a proficient tool through which you can formulate customized watermarks with the help of diverse tools. The best key feature of this tool is that you can effortlessly add a watermark without damaging the quality of your JPG/JPEG file. The specifications of toolbars include that you can increase the size and quality of the text, can adjust the opacity, and select the positioning of the watermark.
You can even select the type of watermark you want, i.e., text or image. To add watermark to JPG/JPEG files through this tool, simply follow these steps:
Step 1: Install WaterMark on your PC
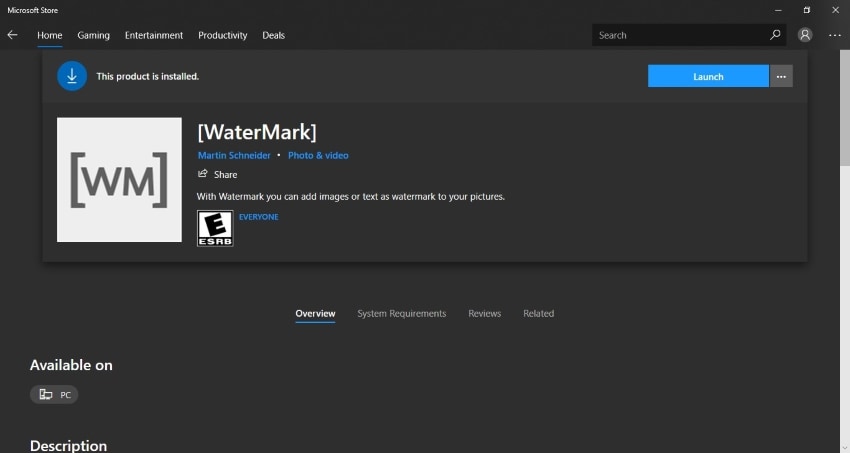
Download the WaterMark app from the Microsoft store. Afterward, open this app to start up the procedure.
Step 2: Import your File
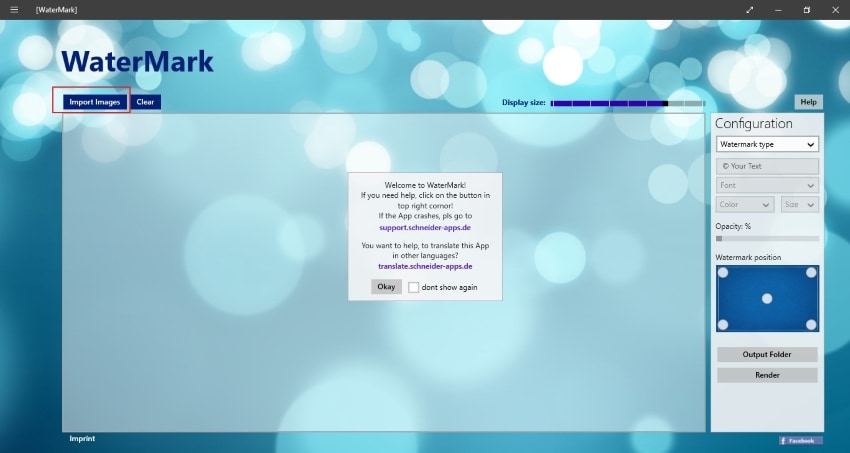
After opening the app, import the image from your computer you want to add a watermark on by clicking on "Import Images."
Step 3: Start Editing
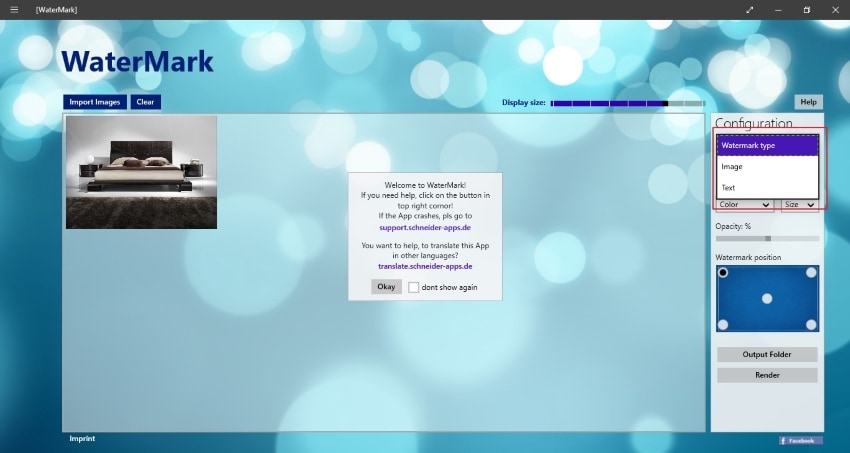
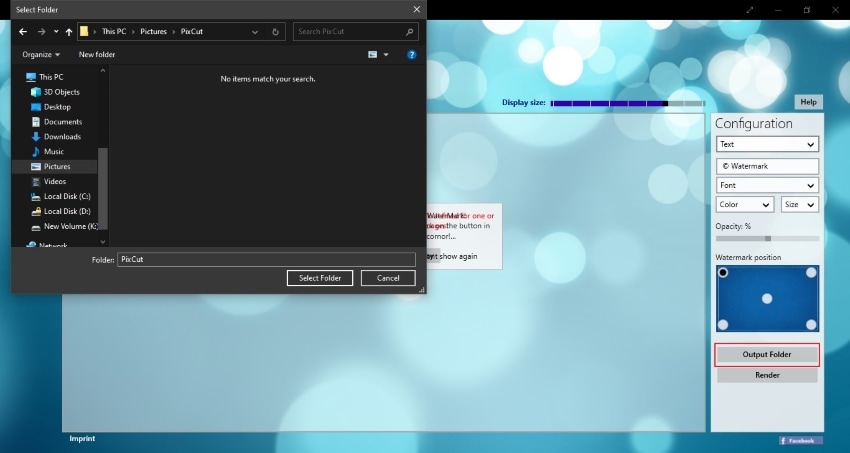
There will be many options available on the toolbar. On the left side, you can select the type of watermark, which can be either a text or an image. Then select the placement of the watermark from the toolbar. After checking out the font, size, color, and opacity, you can add and edit the watermark of your choice.
Step 4: Save your JPG/JPEG File
After editing, select "Output Folder," where you want to save your image file. After selecting the folder, click “Render” to finish the editing.
Part 4: Versatile Watermark App for Both Android and iOS Devices
Everyone wants to edit their image files in a very convenient way. So here we present you with a versatile watermark app for both Android and iOS devices. LogoLicious app can easily be installed on both Android and iOS smartphones. You can easily add customized watermarks, logos, and texts in a fast and easy way.
Its user-friendly interface allows you to add watermark with high resolution of images without the disturbance of ads. The most prominent key feature of this app is that there is no restriction for positioning of watermark on your image.
Do you want to add watermark to JPG conveniently through your device? Then follow these easy and simple steps:
Step 1: Download LogoLicious App
To start up the process, download the LogoLicious app from either the play store or iOS, depending upon your device.

Step 2: Select Image
After installing this app, choose the image you want to edit by clicking on "Select Image." After choosing an image from the gallery, check out all the options available on the toolbar, such as font, color, size, and watermark placement.

Step 3: Add Watermark
After selecting the font color and size, choose the type of watermark you want, which can be either a text or an image.

Step 4: Save Image on Device
After adding a watermark, to download the image file, select "Save on Device" by clicking on it. Then add the name of the folder you want to place the file and click "Save." Your image file will be saved on your device.

Bonus Tip: Powerful Tool to Remove Unwanted Objects From JPG/JPEG Files – PixCut
Do you want to know the easiest way to remove watermark JPG/JPEG files? Then this part of the article will disclose the most powerful tool to eradicate and remove unwanted objects from JPG/JPEG files.
Wondershare PixCut is a game-changer tool for many professionals to make their JPG/JPEG files flawless and radiant. You can comfortably enhance your image quality with the help of special effects and tools and also enlarge it by increasing its size without losing its quality.
You can even remove background and watermark from images to make them intact and perfect. Just follow the simple and easy instructions given below to remove watermark JPEG files successfully:
Step 1: Visit Wondershare PixCut Website
Firstly, go to the PixCut website through your web browser. A webpage will open on your screen of Wondershare PixCut.

Step 2: Click on Remove Watermark
Scroll down the webpage, and you will find a section named "Remove Watermark." Click on it to proceed.

Step 3: Upload your JPG/JPEG File
Upload your JPG/JPEG file according to your ease. You can upload it from the photo gallery, or you can link the image file by pasting its URL. After uploading, now you are good to go to remove the watermark from the image.

Step 4: Explore Toolbar
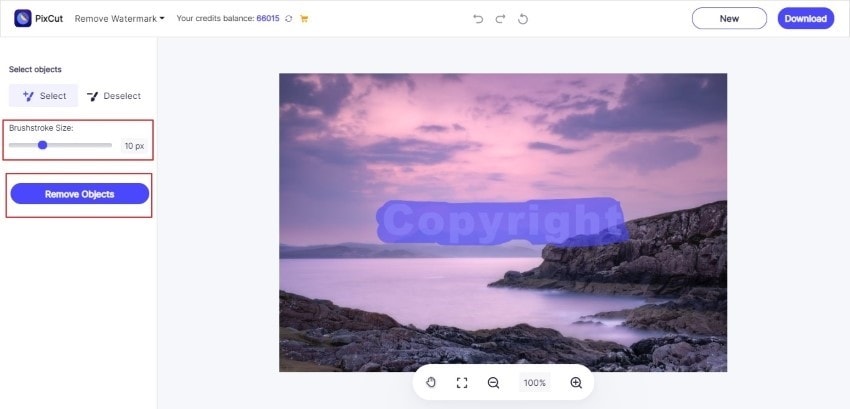
To remove the watermark, click on "Select" from the toolbar and tap on the image from where you want to remove it. You can also check the size of the brush from the left side. After finishing, select "Remove Objects" to proceed.
Step 5: Save your JPG/JPEG File
After completing all steps, select “Download” from the top right on the screen. Your image will be saved on your desktop.

Closing Remarks
To make your JPG/JPEG files secure and unblemished, this article has provided all the measures and guidelines. We also shed light on how watermark can lead to various benefits for professionals. The problems were also addressed related to how JPG/JPEG files can be harmed without a watermark. So, to make your task easier, this article also provided you with reliable and safe tools to add watermarks on JPG/JPEG files comfortably.
Do you want to get an appreciation for your photography? Then PixCut will prove to be a revolutionary tool to make all your images appealing and perfect. Wondershare PixCut provides you with the best quality result through its latest features, special effects, and a variety of options. You can enhance all your image files in premium quality without spending a single penny.
