
Resizing an image has always been a challenge for many editors. You can always downscale an image but the challenge gets real when you try enlarging a smaller image to fit the image size requirements of a publication, eCommerce site, and many other applications.
This is due to a couple of reasons. Almost every image comes with noise and unnecessary elements. If you simply scale an image, the size of these elements will also increase while the primary object of your image gets pixelated.
So, how to enlarge a photo without losing quality?
In this article, I am going to talk about how to use Photoshop to enlarge a picture without losing quality. Later in this guide, I will also give you an easier alternative on how to upsize an image without distortion.
Let's dive right into it.
In this article
Part 1 How to Enlarge Photos in Adobe Photoshop
Adobe Photoshop has established itself as the linchpin in image editing and graphic creation. It has a plethora of tools that help a user to carry out even the smallest of editing tasks. This is exactly why Adobe Photoshop is standing firmly on its ground at the face of many online editing tools.
When it comes to enlarging an image without distortion, the credit goes to Preserve Details 2.0 which was an image enlargement algorithm that was primarily launched to deal with large size prints with Adobe Photoshop CC in 2018.
So, how to use Photoshop to resize an image without losing quality?
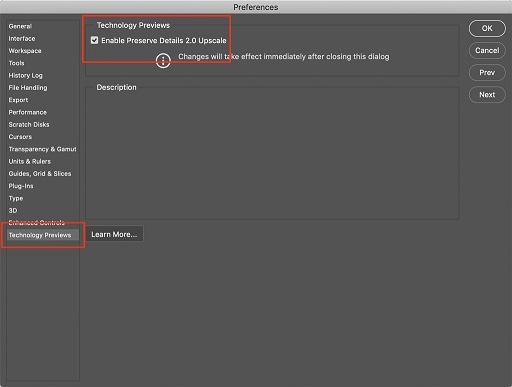
Step 1:
Open your image in Photoshop and make sure the "Preserve Details 2.0" is enabled. To do this, click on the "Photoshop" options, followed by "Preferences" and then, "Technology Reviews". Make sure that the checkbox for "Enable Preserve Details 2.0 Upscale" is selected.
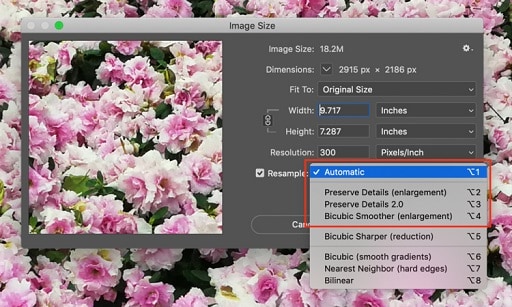
Step 2:
You don't have to restart Photoshop to see the effect of this feature. Just go to "Image Size", check the "Resample" box, and choose the "Preserve Details 2.0" option. By default, Photoshop doesn't play (read: add/remove) with the PPI and resolution of your image. When "Preserve Details 2.0" is turned on, it starts doing that.
Step 3:
Once you've chosen the above settings in Adobe Photoshop, the coast becomes clear to actually start editing your image. Once you select the "Preserve Details 2.0" option, a slider with the text "Reduce Noise" is going to appear.
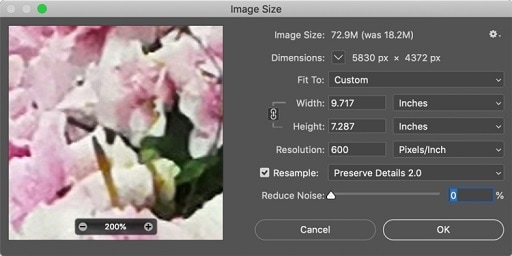
If you're new to Photoshop, your instinct will be to slide it to 100% because who wants noise in their image, right? Wrong! The actual noise depends on what's the resolution of the image you want to keep when using Photoshop to enlarge an image without losing quality.
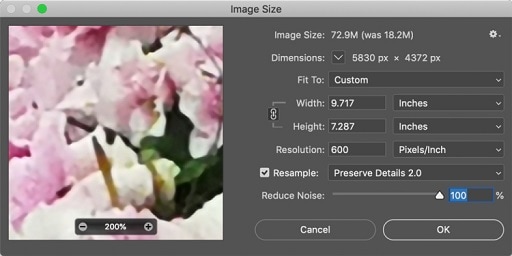
Step 4:
For instance, when doubling your image resolution in the above example, you'll need to reduce noise - possibly between 0 to 100.
Other than that you can experiment with other options in the "image size" options until you get to a point where your image looks perfect post enlarge. The "Preserve Details 2.0" is your best bet when it comes to how to enlarge a photo without losing quality in Photoshop.
Step 5:
Once you are satisfied with your results, save the enlarged image and use it according to your usage.
While Photoshop is a great option to carry out editing tasks like the one above, it is not always preferred due to a couple of reasons. Here are a few:
- Photoshop is heavy software and it comes with some graphics card, memory, and processor requirements. Besides, it's paid software. So, it is not easily accessible to everyone.
- Even if you have access to Photoshop, the software has a huge learning curve. Many professionals even agree that one cannot master every use case of every editing feature Photoshop has.
Due to these drawbacks and more, I am going to cover an easier way to enlarge a photo without losing quality online.
Part 2 A Easier Way to Enlarge Photos Online
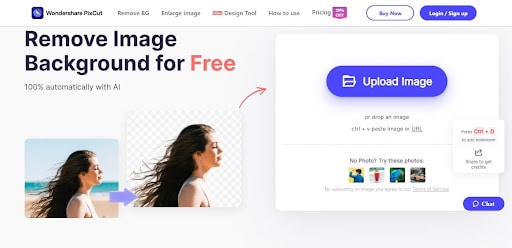
Wondershare PixCut is a hub of online image editing tools, most of which are powered by AI. The tool uses powerful AI algorithms to carry out the most common image editing tasks such as - removing background, enlarging images, etc,
Let's look at how to enlarge an image using Wondershare PixCut.
Step 1:
Go to the above link and click on the "Upload Image" button.
Step 2:
Choose the image you want to edit using the tool. To see the results in real-time, you can use the sample images provided by the tool to ensure that it suits your needs.
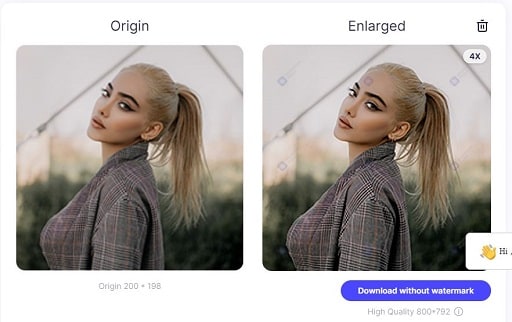
Note how this tool has enlarged the image to 4x without losing quality.
Step 3:
This tool uses smart AI to easily 4X your image resolution with zero manual work. Isn't that perfect? You can save the enlarged image to your PC. The tool uses 1 credit per image. So, you can either purchase credits or refer a friend to get a credit.
Note: WonderShare PixCut is a great tool to enlarge an image without losing quality online. But since most of the work is done by AI, you can use this tool to handle light image enlargement, for instance 4x. To enlarge images for print or other purposes, it is recommended to hire a professional.
Having said that, you can still use Wondershare PixCut to produce amazing results with no manual work, and the resultant image will work great for eCommerce sites, social media banners, or other digital platforms.
Part 3 People also ask
Now that we have covered two ways of enlarging an image without distortion - Photoshop and Wondershare PixCut. Let's answer some common questions related to the topic.
1. How can I enlarge a photo for free?
WonderShare PixCut is the easiest way to enlarge an image without losing quality online and that too for free if you are a new account.
2. How can I make a picture clearer?
The clarity of an image is mostly related to the noise in an image but, at the same time, without noise, an image might look creamy - something that you don't want.
3. How do I enlarge a photo but keep quality?
You can enlarge an image without distortion using multiple online and offline tools. The most used ones are Photoshop (offline) and Wondershare PixCut (Online).
4. Can I enlarge an old photo?
You can obviously enlarge old photos but, understandably enough, you shouldn't hope for the best results because of low PPI and resolution.
5. What is the best tool to get photos enlarged without losing quality online?
Wondershare Pixcut is the best online tool to enlarge an image without distortion.
Conclusion:
I hope this guide helped you enlarge a photo without losing quality. Photoshop is an amazing offline choice if you are a professional editor but Wondershare PixCut should be your choice if you're an entrepreneur looking to get trivial things such as editing an image quickly and seamlessly.
Now that you know the two best tools to enlarge an image without losing quality, what are you waiting for? Go to the official website and edit your images using the power of AI.