
With just a click of a button, you can get any item at your doorstep. Thanks to the emergence of online shopping platforms that continue to upgrade the mode of buying goods and services. A renowned cloud-based tool is the Shopify platform. This is an application that retailers use to sell their goods and comprises a “Point Of Sale” app for payment of goods in physical stores.
With Shopify, merchants can compose a multi-channel experience that in turn boosts their brands and upsells their products. All you need to do is create a website and post your products there for sale. But ensure that the images are clearly visible to help buyers get a perfect view. One way to do that is to learn how to enlarge an image in Shopify for improved visibility.

In this article
Why Shopify?
Shopify gives you a platform to sell any product from any region of the world. More so, you can reach a large clientele with just a click of a button. Here are some reasons why merchants throng Shopify to market and sell their products.
- An intuitive interface: No worries when it comes to setting it up. You’ll get all software and hosting from Shopify. Furthermore, it takes care of all software updates for improved performance.
- Quick to set up: The process is simple and painless. You will easily launch your online store without hefty costs. More so, video guides are available for in-depth guidance.
- Customer support: Whenever you need assistance, Shopify customer support is readily available, with instant response time. You can get assistance through a phone call, email, or webchat.
- Personalize your page look:Easily customize how you want your Shopify platform to look. It splashes you with over 160 themes, paid and free, to make your online shop unique.
- Secure:Dealing with customers’ sensitive information like credit card details needs a safe landing point. That’s what Shopify does!
Why do we need to enlarge an image in Shopify
You might be wondering why you need to enlarge Shopify images. Following you will find the possible reasons.
- Enhanced visibility Well, it is said that content is king and visual content carries the day. It is a powerful mode of communication as it will generate more social and network engagement. An enlarged image will drive attention to the viewer and possibly engage them beyond such as buying the product.
- For clarity No buyer wants to spend their bucks on what they are not sure about. Once you enlarge an image in Shopify, potential buyers will know various aspects of the products in detail. They won’t have to zoom the image any further, but just a glimpse will give all the necessary information.
- Attractiveness There is no way a potential buyer is going to focus on a tiny image. Some people have poor visions and will not strain for long.
How to enlarge an image in Shopify
There are recommended Shopify image sizes to clearly be visible on all channels that your products are viewed from. It’s not all images posted will achieve the goal. Image optimization is key by readjusting your image size and compressing them to manageable file sizes. Actually, the minimum size that is needed for zoom-in is 800 x 800 pixels. Also, see to it that the resolution is maintained at 72 dpi.
You have two options to enlarge the image in Shopify. By using:
i) The Shopify online image resizer tool
ii) From your Shopify account.
Let’s look into them in detail.
Using Shopify online image resizer
Shopify’s image resizer tool can help you to achieve a perfect size for your images. Follow these steps to resize your image.
Step 1
Add your image
Go to the “Shopify” image resizer tool website and click on the green “Upload Now” button. You can also add images by dragging and dropping them into the browser. Remember, Shopify will accommodate a maximum of 6 images for resizing at any given time.
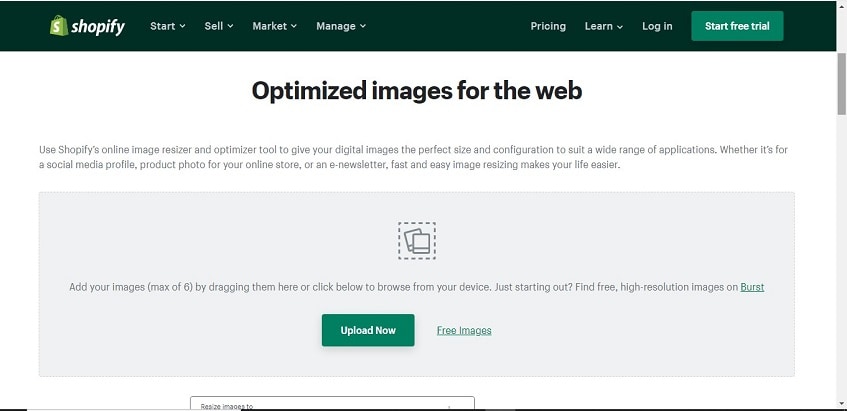
Step 2
Choose the dimensions
Click on the drop-down arrow to choose which dimension to resize your image to. For larger image, use the (4472px x 4472px) choice. Others are compact and medium options. Just click on the drop-down arrow, and the other two options will be availed for you to choose from.
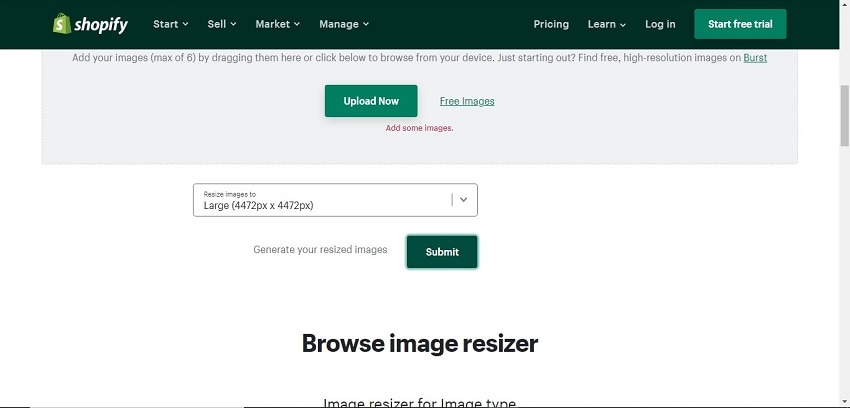
Step 3
Generate resized image
The final step is to generate the resized image. Here, click on the “Submit” tab to generate the image and save it. You can choose which format to save your image to.
Resize image from Shopify account
Apart from the online image resizer, you can also enlarge an image from your Shopify account.
Step 1
Log into your account
First, log into your “Shopify” account and go to the “Settings” section. A set of settings will then appear on your screen. Click on the “Files” option and pick a photo from the available list. Next, choose the “Edit” tab and wait for the “Photo Editor” dialog box to open. Then select the “Resize” tab.
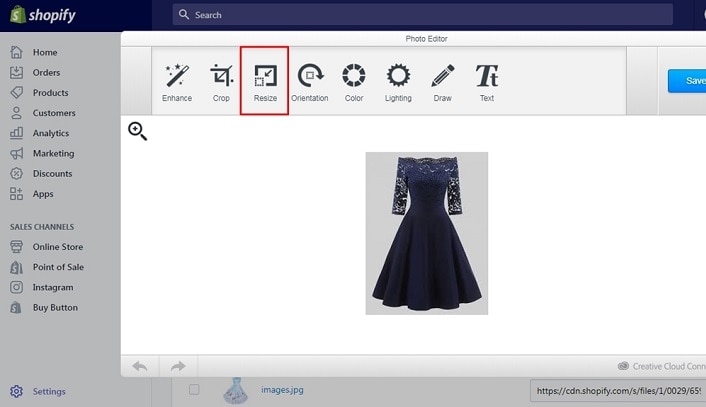
Step 2
Specify the image size
Enter which size you wish to resize your image to. Once you enter the width, the system will proportionally fulfill the height. Then click on the “OK” button to effect the changes.
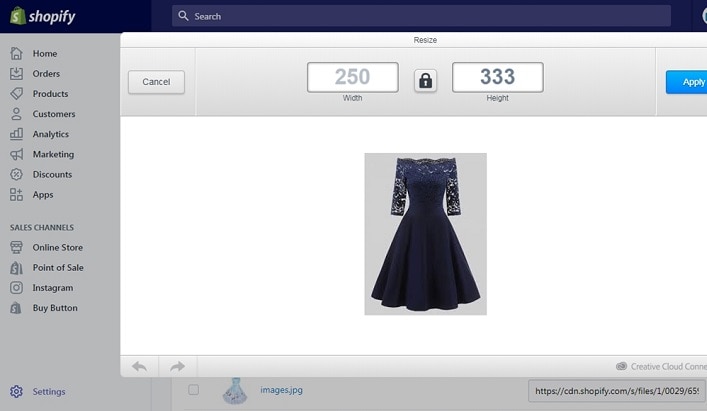
Step 3
Apply changes
You need to click on the “Apply” button to make the changes effective. You can preview and always make changes to the settings if the image isn’t as large enough as you desired.
Step 4
Save
Hit on the "Save" button to save the changes you made to the image. It will now bear the dimensions of the settings you made earlier.
PixCut - An option to enlarge an image for Shopify usage
You may need to engage other tools to enlarge an image on Shopify. Remember, the Shopify online tool only accommodates up to 6 images at a time. It is, therefore, slow, and you may not achieve all the desired images in good time. PixCut is an online tool that focuses on the proficiency and editing of your images. It is efficient and supports vast image formats. Besides, you can choose to remove the watermark after resizing your image. Likewise, PixCut is time-efficient, you only need to add an image, and it automatically enlarges it. You don't need any further skills to operate it, and no installation is required. Here are the steps.
Step 1
Add your image
Go to the “Shopify” image resizer tool website and click on the green “Upload Now” button. You can also add images by dragging and dropping them into the browser. Remember, Shopify will accommodate a maximum of 6 images for resizing at any given time.
Step 2
Choose the dimensions
Click on the drop-down arrow to choose which dimension to resize your image to. For larger image, use the (4472px x 4472px) choice. Others are compact and medium options. Just click on the drop-down arrow, and the other two options will be availed for you to choose from.
Step 3
Generate resized image
The final step is to generate the resized image. Here, click on the “Submit” tab to generate the image and save it. You can choose which format to save your image to.
Resize image from Shopify account
Apart from the online image resizer, you can also enlarge an image from your Shopify account.
Step 1
Upload image
Visit the “PixCut” site and click on the “Upload image” tab and choose the picture you want to resize. You can also drag or copy and paste the image to the screen.
Step 2
Automatically enlarge the image
PixCut will go ahead to enlarge your image in just a few seconds.
Step 3
Download image result
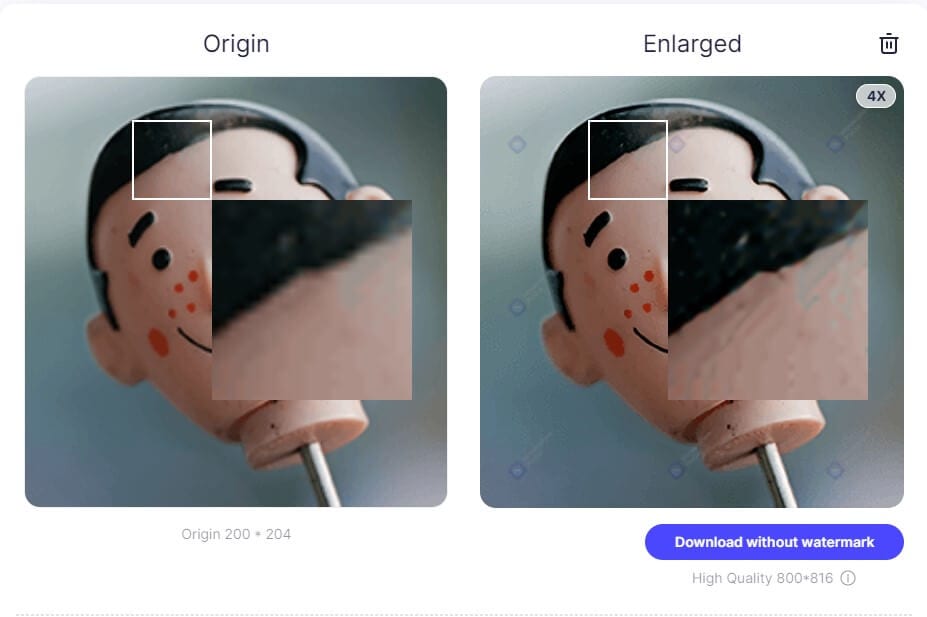
Finally, download the resized image and export it to Shopify. PixCut can enlarge your image up to 4 times its original size. More so, it won’t lose the original image quality after resizing it.
Free to Remove Image Background
Try PixCut which is 100% automatic with AI to remove your image background for free.
Extra Tip: How to Resize Images for Web
Remember, Shopify is a cloud-based platform, and the resized images will be used from an online site. You, therefore, need to pay attention to some aspects before you resize the file.
1. Pick the correct format
You can save your images in various formats. Before you resize an image, decide how you are going to save your image. The three most versions are the jpeg, png, and gif. JPEG is used for screenshots and other images. These use lossy compression and will always be in reduced file size. The PNG usually contains sharp geometric shapes as they bear most curves and lines. They use lossless compression and can hold onto any image data. The GIF format is basically for animations and not suitable for still mages.
2. Quality settings
It’s the settings that will make your images clear. Ensure you choose appropriate settings in consideration of the file size.
3. The number of pixels
Shopify recommends a certain number of pixels for various images. Remember that each pixel in an image requires a given number of bytes for encoding. A smaller image contains fewer pixels than a larger image.
Conclusion
There is no better way to reach a larger audience than to go online. Shopify provides a perfect platform where you can own a business and stay competitive in the technological world. The best mode is to use videos and images to further enhance sales.
Do you want to know the best part? Your images should be the right size so that your potential buyers get all the details they require. We have covered how to enlarge an image in Shopify while maintaining the correct resolution. You can either enlarge your image on the Shopify platform or engage other online tools like PixCut for easy solutions.